Sunday, December 18, 2005
Saturday, December 17, 2005
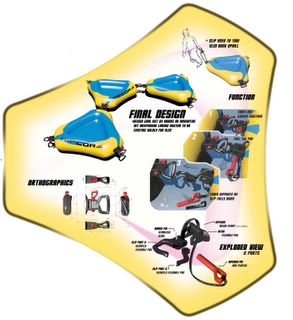
Half of the final presentation board showing the final designs and functions of the RIPCORD Snow Tube Linking System. The Final design is basically a cheap way for kids to link there tube sleds together. Becuase of the strap system the clips can link to anything that they will fit around such as handles of other sleds. They can be linked in many arrangements as well. The linking system acts similar to a carrabeiner so the possablities are endless.

Wednesday, October 26, 2005
Monday, October 10, 2005
A sketch from my 5 week long MP3 project. The idea is a handheld "DJ-ing" device. If you could imagine a sound orientated video game this would be it. It has two circular control pads a center slider control and two triggers. The triggers change the function of the control pads from track scrolling to rotery dial. The idea is rather than only involve the gamer in hand eye cordination to also involve them in hand ear cordination as well. This is one of over 50 sketches done in the development of this concept however, I feel it does show the general form factor and human scale quite well.


Monday, October 03, 2005
Tuesday, September 27, 2005
Sunday, September 25, 2005
Monday, September 19, 2005
Thursday, August 04, 2005
Thursday, July 28, 2005
Friday, July 22, 2005
Thursday, July 21, 2005
Thursday, July 14, 2005
An in class exercise done in Design Drawing 3. Here we are comming up with products and choosing a sutable layout to show them to there full potential. Aspects such as contrast, readablity, composition, and cool factor all come into play here. The largest sketch should read 1st and have the most impact on the page. This should initially capture the viewers eye and bring them into the compostion. To support the "hero shot" are details and secondary sketches. These serve to better show off the product and its features. A large branding logo is alo incorperated but sketched lightly as to not distract from the product. One will also notice how the dark background links all the images together on the page and the boarders keep the sketch contained. This exercise took about 40 min to complete using Prismacolor pencils and a dark blue Copic brand marker.


A homework assignment for Design Drawing 3. The assignment was 2 cubes per page. The cubes had to include parting lines, buttons/ controls, LCD/ displays, through holes, etc. Were also had to sketch a range of different materials on the volumes. Here is one page I sketched with a wooden/ brushed aluminum volume next to a matte one. The chrome detail on the smaller box next to the display really makes this composition pop from the page.


Monday, May 23, 2005
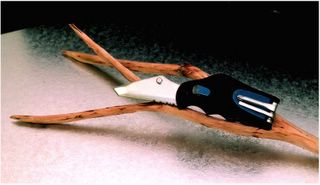
This is my Product 1 final presentation and the result of my 1st 2 years of industrial design. I have finally completed my 1st actual product design course combining skills of modelmaking, sketching & rendering, as well as computer graphic design/ layout backed by lots of research. The assignment was camping gear. Behold the Gerber LiteWave knife. This light titanium core knife is designed and targeted for the young active climber/hiker. This knife was designed to deliver just the right amount of functionality to its target market. 1st and foremost it is a knife, featuring a partially serrated steel tanto style blade with assisted opening action made available using a torsion spring and lock bearing. It's secondary functions include an L.E.D. with 4 distinctly different light patterns (low, high, blink, and SOS), A Phillips head screwdriver, a flat head screwdriver, and a fold away large hook for carabineer use. The knife comes in black and 4 different secondary colors (blue, red, green, and yellow) as well as left and right handed versions. Sporty looks and great ergonomics make the LiteWave knife inviting to have in the hand and comfortable. The strength and styling of the tanto blade in contrast keeps the LiteWave knife from losing its feeling of a powerful tool.

For my 1st actual full on product presentation I think it went quite well. My presentation boards were very large and easy to read. I used risers to help my presentation pop off the background even more. The table the model is sitting on is just a spray-painted piece of foam core with paper backing (looks like steel or something). I made the model from Renshape (synthetic wood), laser cut acrylic blade/tools, and a lot of bondo. The L.E.D. actually does work when you press it down and is quite bright. And yes that is track lighting on the ceiling. And no I didn't whittle the stick with the knife model. In terms of presentation mine really stood out from the crowd, as for the product would you buy one?

For my 1st actual full on product presentation I think it went quite well. My presentation boards were very large and easy to read. I used risers to help my presentation pop off the background even more. The table the model is sitting on is just a spray-painted piece of foam core with paper backing (looks like steel or something). I made the model from Renshape (synthetic wood), laser cut acrylic blade/tools, and a lot of bondo. The L.E.D. actually does work when you press it down and is quite bright. And yes that is track lighting on the ceiling. And no I didn't whittle the stick with the knife model. In terms of presentation mine really stood out from the crowd, as for the product would you buy one?
Here is K-bot (named after the K'nex toy used to build the body). I built this robot on my spare time this semester. The schematic is based on the "herbie" robot from the "junkbots" book. It is a line following/ light-seeking (phototropic) robot. It is powered by a 9v battery and driven by 2 clear servo motors modified to spin continuously. Since this robot was built with k'nex the light sensor arms can be places on may different positions including reversed and aimed downwards so that it can follow black lines on white paper. When the touch sensors on the front are activated the robot travels backwards for a short period of time then forward again via a relay and capacitor. Out of coincidence I was able to participate again in the Design problem solving classes final assignment, a line following robot that can navigate a maze collect balls and avoid mousetraps. With some slight tinkering I was able to get K-bot running excellently through the maze. He wasn’t the fastest but he managed to collect the most magnetic balls (4) and still have a respectable time. Unlike most of the other robots K-bot had touch sensors and was configurable to run as a phototropic robot as well. It's really neat little bot.


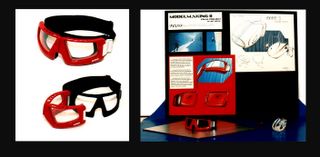
These goggles are the result of 3 weeks hard work on the most ambitious model I have ever built. They were created for the final assignment in modelmaking 2, eyewear from scratch. You might remember this design from my Design Drawing 2 final posts. It is almost identical to those drawings done last year. The concept is the same as well. Extreme goggles for extreme mountain climbing situations. The high points of these goggles are that they not only look like the concept but with 3 brass tubing hinges they also work like the concept. As you can see the initial front lenses fold out and away for quick emergency clear vision. The only things sourced on this model are the strap and logo. The goggles themselves are made of Renshape (synthetic wood material), the top vents are lazercut pieces of acrylic, the goggle backing is vacuum molded styrene, the liner is a cut piece of Neoprene (wet suit material), and the lenses are clear styrene laboriously cut and sanded to fit into small grooves in the goggle frame. You can't see it in the pictures but the strap actually says UVEX as well adding to the very realistic look of the model. Overall I am very pleased with the outcome.

Friday, March 25, 2005
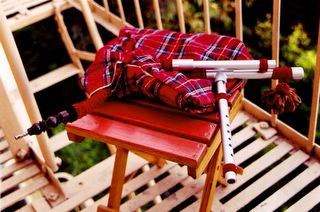
This was a project done for a Visualization of Music class I am taking as an elective. It looks like a bag pipe but is technically a bag whistle (bag pipes have reeds this uses several penny whistles to replicate the sound). It is made from a boxed wine bag, clear tubing, PVC piping, a hukka hose, and alot of bondo. I decorated it with plaid fabric and silver spray paint. It doesn't sound all to great due to the bag being a little small (not to mention my lack of any bagpiping skills) but I've been able to get a nice note or two ;)

Tuesday, March 22, 2005
This is my Modelmaking 2 midterm project. It's a small model with 3 interlocking parts. To create these I first had to make 3 seperate silicon molds one for each peice. The peices were 1st sculpted in Renshape (synthetic woodlike material) and then used to make the clear silicon molds. After the molds were made I casted several models with Fast Cast (2 part catalyzing hardening resin, takes about 10 min. to harden) The best peices I painted and clear coated. The clear model was done the same way only using a clear hard Urethane. This was a hard project to complete well because of the short working times of the materials used and the need to eliminated all bubbles from both the clear molds and Urethane. A small Vacume chamer was used to do this however its a tricky thing to get right the 1st time. And the pressure is always on to get things right the 1st time especially when a few ounces of silicon is quite expensive. Overall I am pleased with my results.


Tuesday, March 15, 2005
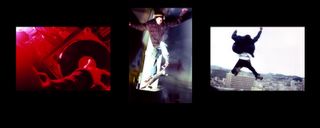
Another Photo Storyboarding assignment. This time we had to photograph a feeling or mood. I used energy as my theme here. Everything was shot onto color slides. I used a red flash for the turntable shot, and a remote flash without side curtain for the skateboarding. One the last shot I excuded the landing to make it seem as though he was jumping off a roof. (models are my friends Stefin skating and Jim jumping) Spring 05

Tuesday, March 08, 2005
Sunday, March 06, 2005
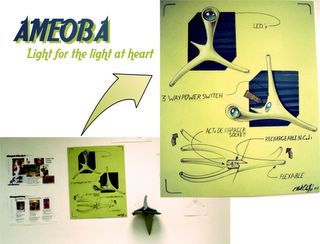
1st Project done for Product 1. The objective was to design a flashlight or lighting device. This is what I came up with. I call it the Ameoba light. It consits of four L.E.D.'s molded into an elastomeric material in the shape of an ameoba. There are wires also molded into it so that when the arms are bent they will stay in that position. On the bottom is a lamp that also functions as a 3-way power switch controling all the lights. Inside there are several rechargable batteries. The target market are children and people who are keen on interesting gadgets and like to have fun. The final presentation involved having a comunication or function board, a target market board, competion board, 5 view orthographics, and a fullsized model of the light. The model is made out of foam and covered with Bondo to give it a smooth surface. The function board is light green Canson paper. I Used AD markers, Nue-pastels, and white Prismacolor to create the drawings.

Subscribe to:
Posts (Atom)


